Week 9: Input Devices
This week, I decided to move from Windows
to OS since there's more knowledge in the community about AVR
programming in OS than in Windows.
First of all, I redid the assignment from Week 7 on the Mac in the
lab. I successfully programmed the board and managed to make the
LED blinking.
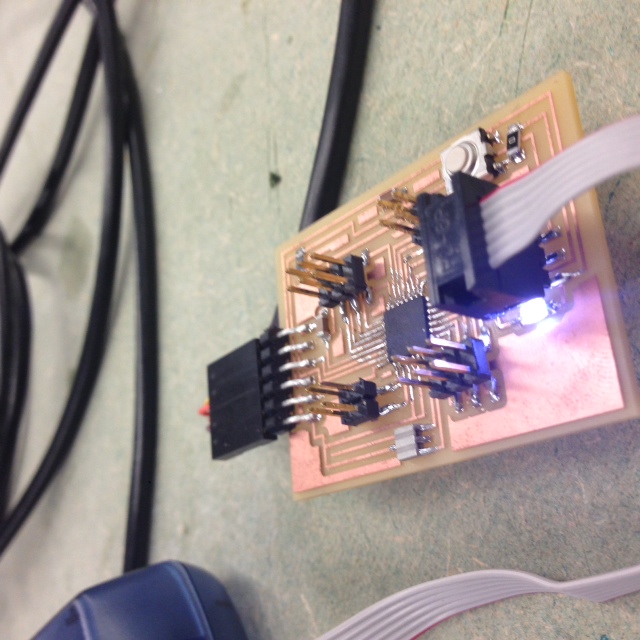
Then, I tried to experiment with the phototransistor for this
week's assignment.
I used those board traces
and interior
to mill the board. Then, I used the c
code and makefile.
The programming was successful as terminal returned below
messages:
PHYS-LAB-24:desktop
physicslab24$ avrdude -p t45 -c avrisp2
^[[A
avrdude: AVR device initialized and ready
to accept instructions
Reading | ##################################################
| 100% 0.00s
avrdude: Device signature = 0x1e9207
avrdude: Expected signature for ATtiny45 is
1E 92 06
Double check chip, or use -F to override this check.
avrdude done. Thank you.
PHYS-LAB-24:desktop physicslab24$ avrdude
-p t44 -c avrisp2
avrdude: AVR device initialized and ready
to accept instructions
Reading | ################################################## | 100% 0.00s
avrdude: Device signature = 0x1e9207
avrdude: safemode: Fuses OK (H:FF, E:DF,
L:7E)
avrdude done. Thank you.
PHYS-LAB-24:desktop physicslab24$ avrdude
-p t45 -c avrisp2
avrdude: AVR device initialized and ready
to accept instructions
Reading | ################################################## | 100% 0.00s
avrdude: Device signature = 0x1e9206
avrdude: safemode: Fuses OK (H:FF, E:DF,
L:62)
avrdude done. Thank you.
PHYS-LAB-24:desktop physicslab24$ make -f
hello.light.45.make
avr-objcopy -O ihex hello.light.45.out
hello.light.45.c.hex;\
avr-size --mcu=attiny45 --format=avr
hello.light.45.out
AVR Memory Usage
----------------
Device: attiny45
Program: 502 bytes
(12.3% Full)
(.text + .data + .bootloader)
Data:
1 bytes (0.4% Full)
(.data + .bss + .noinit)
PHYS-LAB-24:desktop physicslab24$ make -f
hello.light.45.make program-avrisp2
avr-objcopy -O ihex hello.light.45.out
hello.light.45.c.hex;\
avr-size --mcu=attiny45 --format=avr
hello.light.45.out
AVR Memory Usage
----------------
Device: attiny45
Program: 502 bytes
(12.3% Full)
(.text + .data + .bootloader)
Data:
1 bytes (0.4% Full)
(.data + .bss + .noinit)
avrdude -p t45 -P usb -c avrisp2 -U
flash:w:hello.light.45.c.hex
avrdude: AVR device initialized and ready
to accept instructions
Reading | ################################################## | 100% 0.00s
avrdude: Device signature = 0x1e9206
avrdude: NOTE: "flash" memory has been
specified, an erase cycle will be performed
To disable this feature, specify the -D option.
avrdude: erasing chip
avrdude: reading input file
"hello.light.45.c.hex"
avrdude: input file hello.light.45.c.hex
auto detected as Intel Hex
avrdude: writing flash (502 bytes):
Writing | ################################################## | 100% 0.17s
avrdude: 502 bytes of flash written
avrdude: verifying flash memory against
hello.light.45.c.hex:
avrdude: load data flash data from input
file hello.light.45.c.hex:
avrdude: input file hello.light.45.c.hex
auto detected as Intel Hex
avrdude: input file hello.light.45.c.hex
contains 502 bytes
avrdude: reading on-chip flash data:
Reading | ################################################## | 100% 0.16s
avrdude: verifying ...
avrdude: 502 bytes of flash verified
avrdude: safemode: Fuses OK (H:FF, E:DF,
L:62)
avrdude done. Thank you.
Then, I downloaded the python
file, identified USB port on my laptop, and managed to do a
testing for the measurement.
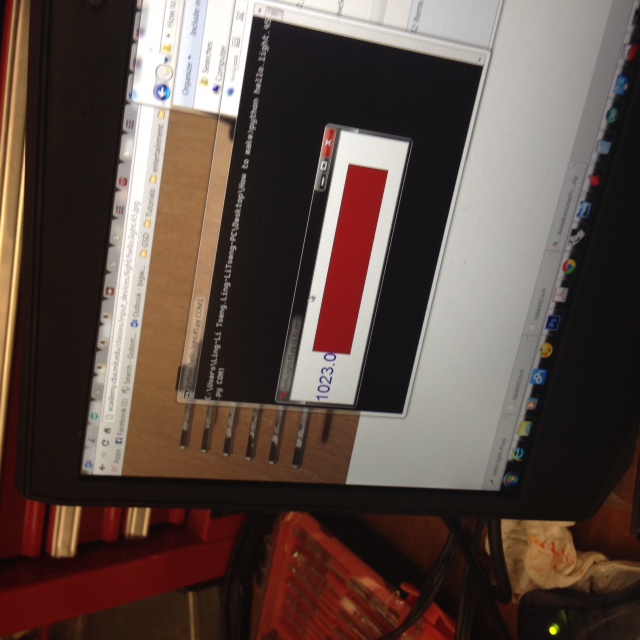
The meter showed up but the reading didn't move with the change of
light. I suspect it's because the sensor wasn't properly soldered
on the board. I'll look into it further.
A few issues that I ran into and solutions:
(1) Lab computer did not recognize FTDI as a USB port. I changed
to a PC and read the port from device manager. Then I ran
the python program on PC.
(2) Make sure you always load setting in fab module before milling
otherwise you might ran into errors.
(3) If you cannot cut through the board, check if you put the
endmill too high when you zero it and z axis doesn't have enough
space to further go down.
(4) If you have an even milling results on the board, make sure
your taps behind the board are flat: no overlapping and no heads.